Today I’d like to share a few tips and resources for taking and managing screenshots on Macs. We’ll start with the basics and move on to the more advanced tactics.
Take a screenshot of your entire screen
Command-Shift-3
Take a screenshot of a portion of your screen
Command-Shift-4 then highlight the area you want to capture
Take a screenshot of a specific window
Command-Shift-4 then press space then click on a window
Change the directory where your screenshots are saved
By default they’re saved to the desktop, but you can change the destination.
Take a screenshot of an entire webpage, part 1
For this I highly recommend the Blipshot Chrome extension by Automattician Davide ‘Fol’ Casali. It will automatically scroll down the page, take a screenshot of each section, and piece them together into a single screenshot that you can save to your computer.
Take a screenshot of an entire webpage, part 2
If you find yourself taking a lot of screenshots and are interested in a way to organize them, check out the Ember Mac app.
When you use its Chrome extension to take a screenshot, you can specify a category which will group those screenshots together:
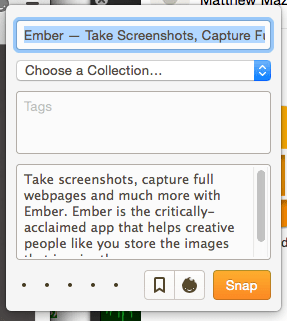
You can then browse your collections in the Ember Mac app.
The major downside to Ember though is the way it takes screenshots. Unlike Blipshot which will take a screenshot of the page as it currently stands, Ember seems to reload the page internally and then take a screenshot of that freshly reloaded page. So if you’re working with a JavaScript-heavy site, Ember’s screenshots won’t reflect any of the changes that have taken place since you loaded the page. Also, Ember doesn’t work with Flash websites.
My hacky workflow for managing screenshots is to use a combination of Ember and Blipshot. For capturing simple websites that I want to organize (where a screenshot of a freshly loaded page will do and it doesn’t use Flash) I use Ember. For sites where I want the screenshot to reflect the current state of the front-end or sites that use Flash, I take a screenshot with Blipshot, then drag it into the appropriate collection in the Ember app.
One question for you all
One thing that’s frustrating is taking screenshots on a Retina displays because all of the screenshots wind up 2x the size that they appear on the screen. Is there a simple way to take a screenshot on a Retina display and have not be 2x? When it’s important that the screenshot not be 2x, I load it in Pixelmator and shrink it to 50% of its original size. Kind of a pain though.